Last updated: 2024/06/06
1. 境界線地図
多くの場合は、簡単な境界線地図が十分です。Google Mapなどの地図にプロットすると、逆に情報が多すぎます。特に論文に載せる図はほとんどの場合は境界線地図のほうがいいです。
1.1 境界線地図データ(緯度経度座標)
-
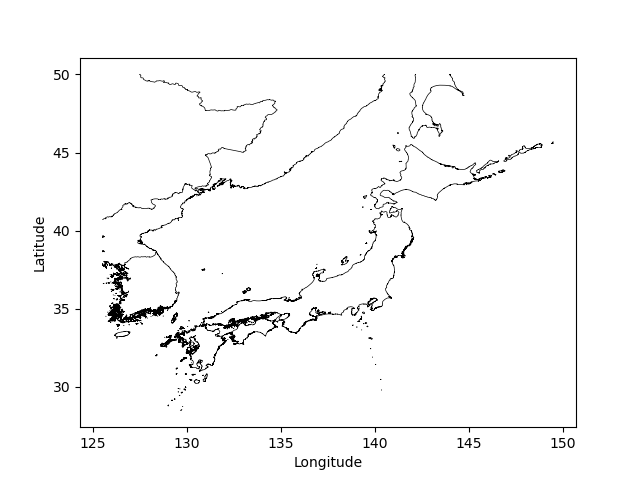
地図データをダウンロード
https://tingwu.info/pylab/data/japanmap.npy -
以下のコードで地図をプロットする
import matplotlib.pyplot as plt
import numpy as np

mapData = 'E:/japanmap.npy' #ダウンロードした地図データの保存先

mapMat = np.load(mapData)
plt.plot(mapMat[:, 0], mapMat[:, 1], c='k', lw=0.5) #境界線の色や太さも設定できる
plt.xlabel('Longitude')
plt.ylabel('Latitude')
plt.show()
import matplotlib.pyplot as plt import numpy as np mapData = 'E:/japanmap.npy' #ダウンロードした地図データの保存先 mapMat = np.load(mapData) plt.plot(mapMat[:, 0], mapMat[:, 1], c='k', lw=0.5) #境界線の色や太さも設定できる plt.xlabel('Longitude') plt.ylabel('Latitude') plt.show() -
できた図
1.2 境界線地図データ(FALMAのXY座標)
FALMAのデータを地図にプロットする場合、FALMA座標の地図データを使ったほうが便利です。
-
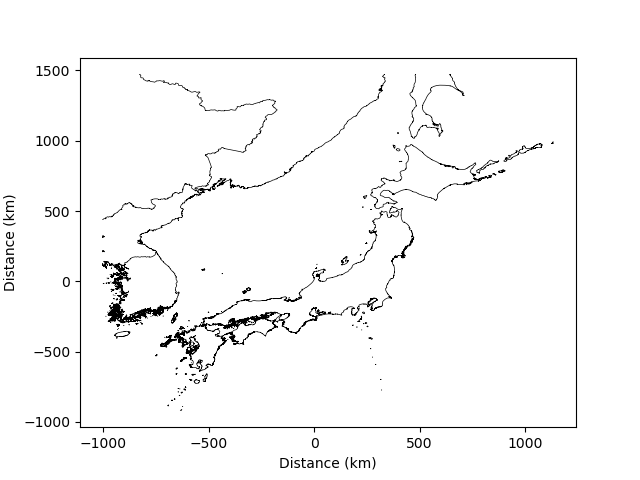
地図データをダウンロード
https://tingwu.info/pylab/data/japanmapXY.npy -
以下のコードで地図をプロットする
import matplotlib.pyplot as plt
import numpy as np

mapData = 'E:/temp/japanmapXY.npy' #ダウンロードした地図データの保存先

mapMat = np.load(mapData)
plt.plot(mapMat[:, 0], mapMat[:, 1], c='k', lw=0.5) #境界線の色や太さも設定できる
plt.xlabel('Distance (km)')
plt.ylabel('Distance (km)')
plt.show()
import matplotlib.pyplot as plt import numpy as np mapData = 'E:/temp/japanmapXY.npy' #ダウンロードした地図データの保存先 mapMat = np.load(mapData) plt.plot(mapMat[:, 0], mapMat[:, 1], c='k', lw=0.5) #境界線の色や太さも設定できる plt.xlabel('Distance (km)') plt.ylabel('Distance (km)') plt.show() -
できた図 (上の図とX,Y座標の単位が変わっただけ)
-
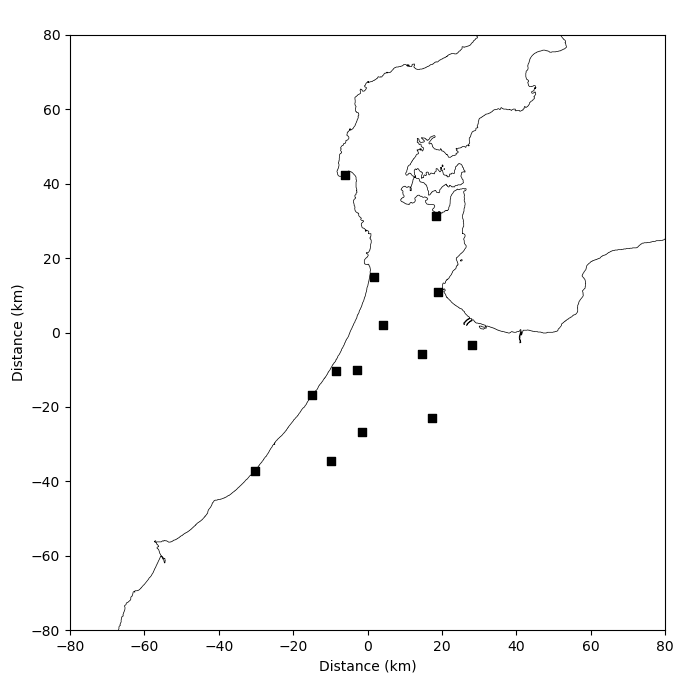
2018年冬FALMA観測サイト地図
import matplotlib.pyplot as plt
import numpy as np

mapData = 'E:/japanmapXY.npy'

#各サイトの位置情報
cAllSite = ['AKK', 'FTK', 'HIM', 'HKI', 'IMZ', 'KGM', 'KZK', 'MIN', 'NAT', 'NNO', 'RGJ', 'SSK', 'TBT', 'TKO']
cAllX =    [-30122, -6049, 19019, 1705, 28180, -1528, -14822, -8462, 17410, 18482, 4198, -9851, -2793, 14617]
cAllY  =   [-37195, 42446, 10759, 14821, -3268, -26877, -16862, -10374, -22990, 31423, 2012, -34659, -10074, -5817]
cAllX = np.array(cAllX)/1000.0
cAllY = np.array(cAllY)/1000.0

f = plt.figure(figsize=(7,7))
ax = f.add_axes([0.1, 0.1, 0.85, 0.85])

mapMat = np.load(mapData)
ax.plot(mapMat[:, 0], mapMat[:, 1], c='k', lw=0.5)
ax.scatter(cAllX, cAllY, marker='s', s=40, c='k')

#表示する範囲を設定する
ax.set_xlim([-80, 80])
ax.set_ylim([-80, 80])

ax.set_xlabel('Distance (km)')
ax.set_ylabel('Distance (km)')

plt.show()
import matplotlib.pyplot as plt import numpy as np mapData = 'E:/japanmapXY.npy' #各サイトの位置情報 cAllSite = ['AKK', 'FTK', 'HIM', 'HKI', 'IMZ', 'KGM', 'KZK', 'MIN', 'NAT', 'NNO', 'RGJ', 'SSK', 'TBT', 'TKO'] cAllX = [-30122, -6049, 19019, 1705, 28180, -1528, -14822, -8462, 17410, 18482, 4198, -9851, -2793, 14617] cAllY = [-37195, 42446, 10759, 14821, -3268, -26877, -16862, -10374, -22990, 31423, 2012, -34659, -10074, -5817] cAllX = np.array(cAllX)/1000.0 cAllY = np.array(cAllY)/1000.0 f = plt.figure(figsize=(7,7)) ax = f.add_axes([0.1, 0.1, 0.85, 0.85]) mapMat = np.load(mapData) ax.plot(mapMat[:, 0], mapMat[:, 1], c='k', lw=0.5) ax.scatter(cAllX, cAllY, marker='s', s=40, c='k') #表示する範囲を設定する ax.set_xlim([-80, 80]) ax.set_ylim([-80, 80]) ax.set_xlabel('Distance (km)') ax.set_ylabel('Distance (km)') plt.show() -
できた図 (この上に標定結果等をプロットすることもすぐできる)
2. OpenStreetMapにプロットする
OpenStreetMapは無料の地図データを提供しているので、プログラムで地図にプロットすることは簡単にできる。
2.1 mplleafletモジュール
mplleafletというモジュールを利用します。しかし、mplleafletは数年間更新されてないので、直接使うとエラーになります。必ず以下のコードで修正版のmplleafletをダウンロードしてください。strDirは必ずこれから作るプログラムと同じ保存先に設定する。 これ以外のコードは変更しない。
import os
import requests
import zipfile

strDir = 'E:/temp/' #<<<<<<<<<モジュールの保存先、地図作成プログラムの保存先と同じ

url = 'https://tingwu.info/pylab/data/mplleaflet.zip'
r = requests.get(url, allow_redirects=True)

open(strDir+'mplleaflet.zip', 'wb').write(r.content)

with zipfile.ZipFile(strDir+'mplleaflet.zip','r') as zip_ref:
    zip_ref.extractall(strDir)

os.remove(strDir+'mplleaflet.zip')
import os
import requests
import zipfile
strDir = 'E:/temp/' #<<<<<<<<<モジュールの保存先、地図作成プログラムの保存先と同じ
url = 'https://tingwu.info/pylab/data/mplleaflet.zip'
r = requests.get(url, allow_redirects=True)
open(strDir+'mplleaflet.zip', 'wb').write(r.content)
with zipfile.ZipFile(strDir+'mplleaflet.zip','r') as zip_ref:
zip_ref.extractall(strDir)
os.remove(strDir+'mplleaflet.zip')2.2 地図をプロットする
さっきと同じようにFALMAの観測サイトを地図にプロットする。
以下のコードのstrDirは上のコードのstrDirと同じフォルダーに設定する必要がある。また、以下のコードのファイルもstrDirに保存する必要がある。
import mplleaflet
import matplotlib.pyplot as plt

strDir = 'E:/temp/' #<<<<<<<上のコードと同じ
mapName = 'mymap.html' #作るのがhtmlファイル

latiMat    = [   36.42482, 37.14248, 36.85695, 36.89355,   36.5178, 36.60805, 36.666517,  36.552833,   37.04315,	36.77813,  36.44767, 36.752083]
longiMat    = [ 136.42265, 136.69226, 136.973, 136.7791, 136.742883, 136.594, 136.665233, 136.954983, 136.966983, 136.80702, 136.64967, 137.297100]

plt.scatter(longiMat, latiMat, s=50, marker='s', c='k')
mplleaflet.show(path=strDir+mapName)
import mplleaflet
import matplotlib.pyplot as plt

strDir = 'E:/temp/' #<<<<<<<上のコードと同じ
mapName = 'mymap.html' #作るのがhtmlファイル

latiMat    = [   36.42482, 37.14248, 36.85695, 36.89355,   36.5178, 36.60805, 36.666517,  36.552833,   37.04315,	36.77813,  36.44767, 36.752083]
longiMat    = [ 136.42265, 136.69226, 136.973, 136.7791, 136.742883, 136.594, 136.665233, 136.954983, 136.966983, 136.80702, 136.64967, 137.297100]

plt.scatter(longiMat, latiMat, s=50, marker='s', c='k')
mplleaflet.show(path=strDir+mapName)プログラムを実行したら、ブラウザに地図が表示される。表示されなければ、ブラウザに作ったhtmlファイルのフールパスE:/temp/mymap.htmlを入力すれば表示される。
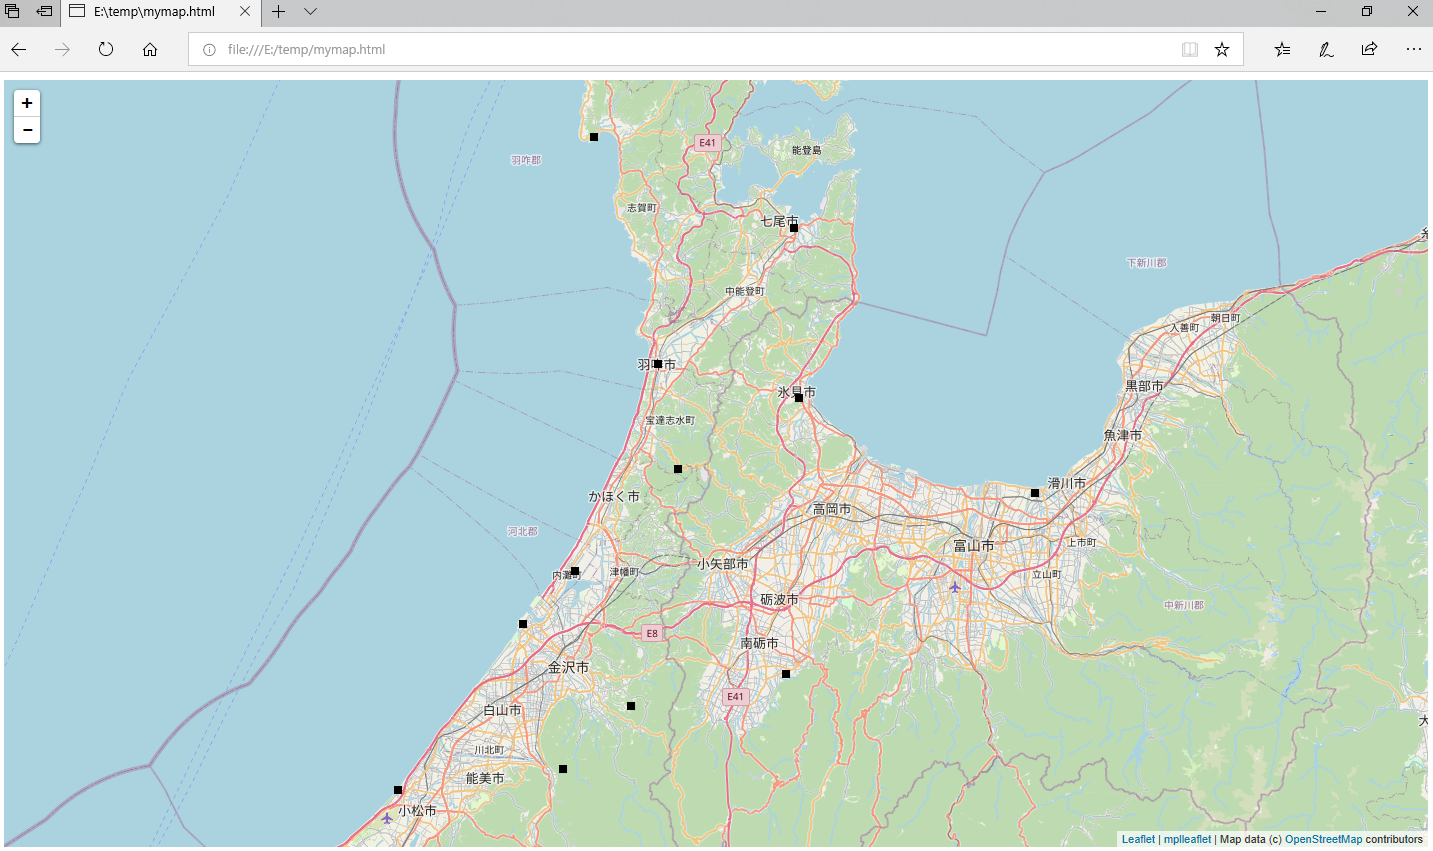
ブラウザで拡大等普通の地図の操作も全部できる。
# うまくできない場合は、研究室SSHサーバを使って、サーバ上で地図を作成してください。
2.3 二次元標定結果を地図にプロットする
以下の標定結果を地図にプロットする
https://tingwu.info/pylab/data/map_2DLoc.dat
import numpy as np
import mplleaflet
import matplotlib.pyplot as plt

strDir = 'E:/temp/'
mapName = 'mymap.html'
locFile = 'E:/temp/map_2DLoc.dat' #標定結果ファイル

R = 6370.519
flmLati = 36.76/180*np.pi #Latitude and longtitude of the center of FALMA
flmLongi = 136.76/180*np.pi

def convertXY(x, y):
    #x in longitude direction, y in latitude direction
    latiVal = flmLati+y/R
    longiVal = 2*np.arcsin(np.sin(x/2.0/R)/np.cos(flmLati))+flmLongi
    return [latiVal/np.pi*180, longiVal/np.pi*180]

#標定結果を読み込む
tMat = []
latiMat = []
longiMat = []
fidLoc = open(locFile)
strLine = fidLoc.readline()
while True:
    strLine = fidLoc.readline()
    if len(strLine)<2:
        break
    tVal = float(strLine[0:10])
    xVal = float(strLine[11:18])/1000.0
    yVal = float(strLine[19:26])/1000.0
    [latiVal, longiVal] = convertXY(xVal, yVal) #X,Yを緯度経度に変換
    tMat.append(tVal)
    latiMat.append(latiVal)
    longiMat.append(longiVal)
fidLoc.close()

#散布図、色で時間を示す(青から赤まで)
plt.scatter(longiMat, latiMat, marker='o', s=20, c=tMat, edgecolor='none', cmap='jet')
mplleaflet.show(path=strDir+mapName)
import numpy as np
import mplleaflet
import matplotlib.pyplot as plt
strDir = 'E:/temp/'
mapName = 'mymap.html'
locFile = 'E:/temp/map_2DLoc.dat' #標定結果ファイル
R = 6370.519
flmLati = 36.76/180*np.pi #Latitude and longtitude of the center of FALMA
flmLongi = 136.76/180*np.pi
def convertXY(x, y):
#x in longitude direction, y in latitude direction
latiVal = flmLati+y/R
longiVal = 2*np.arcsin(np.sin(x/2.0/R)/np.cos(flmLati))+flmLongi
return [latiVal/np.pi*180, longiVal/np.pi*180]
#標定結果を読み込む
tMat = []
latiMat = []
longiMat = []
fidLoc = open(locFile)
strLine = fidLoc.readline()
while True:
strLine = fidLoc.readline()
if len(strLine)<2:
break
tVal = float(strLine[0:10])
xVal = float(strLine[11:18])/1000.0
yVal = float(strLine[19:26])/1000.0
[latiVal, longiVal] = convertXY(xVal, yVal) #X,Yを緯度経度に変換
tMat.append(tVal)
latiMat.append(latiVal)
longiMat.append(longiVal)
fidLoc.close()
#散布図、色で時間を示す(青から赤まで)
plt.scatter(longiMat, latiMat, marker='o', s=20, c=tMat, edgecolor='none', cmap='jet')
mplleaflet.show(path=strDir+mapName)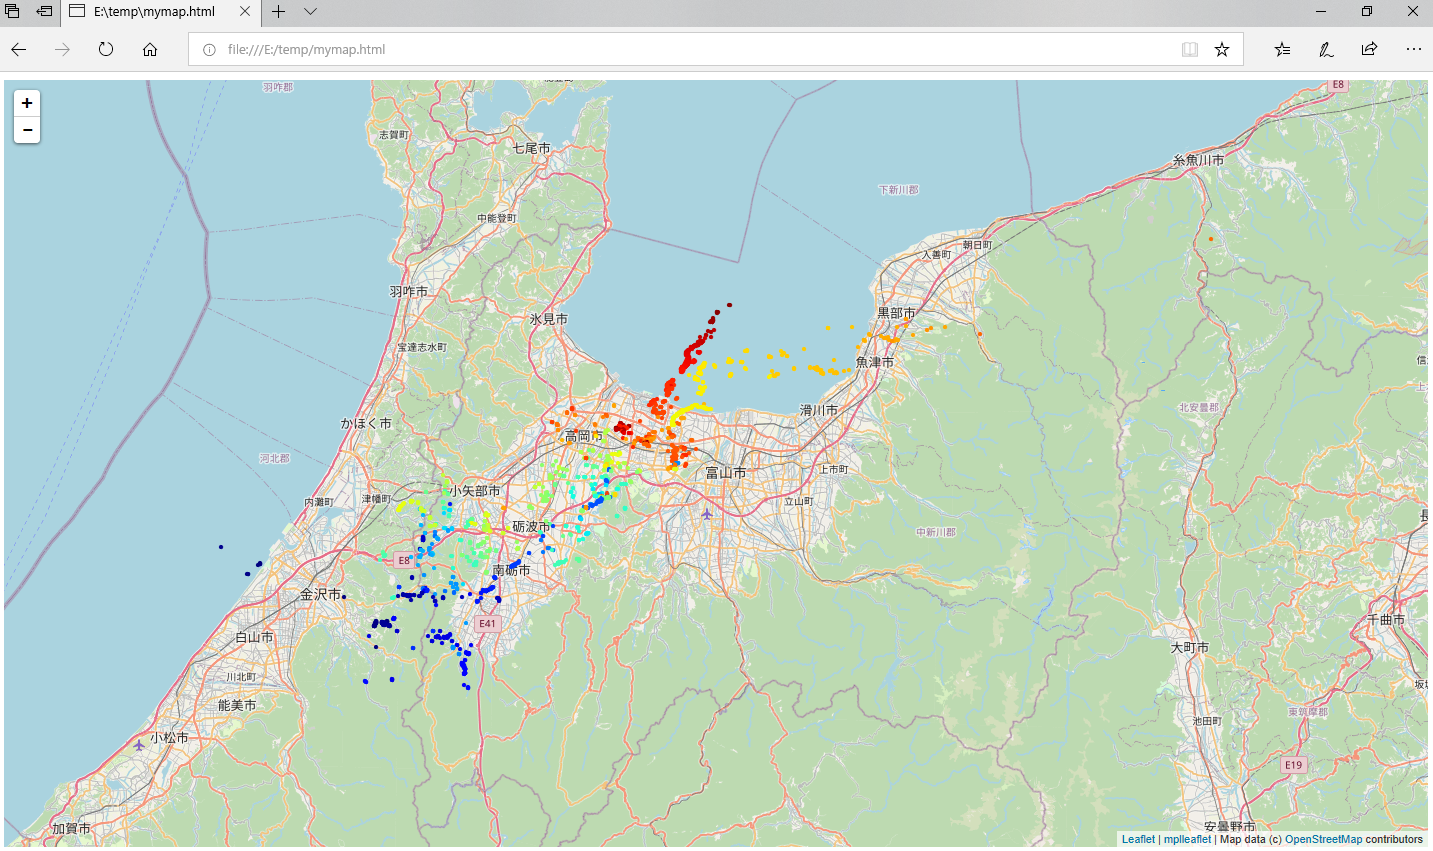
2.4 地図の種類
-
上のコードの最後の一行を以下に変更すれば、できた地図は航空写真になる。
mplleaflet.show(path=strDir+mapName, tiles='esri_aerial')
mplleaflet.show(path=strDir+mapName, tiles='esri_aerial')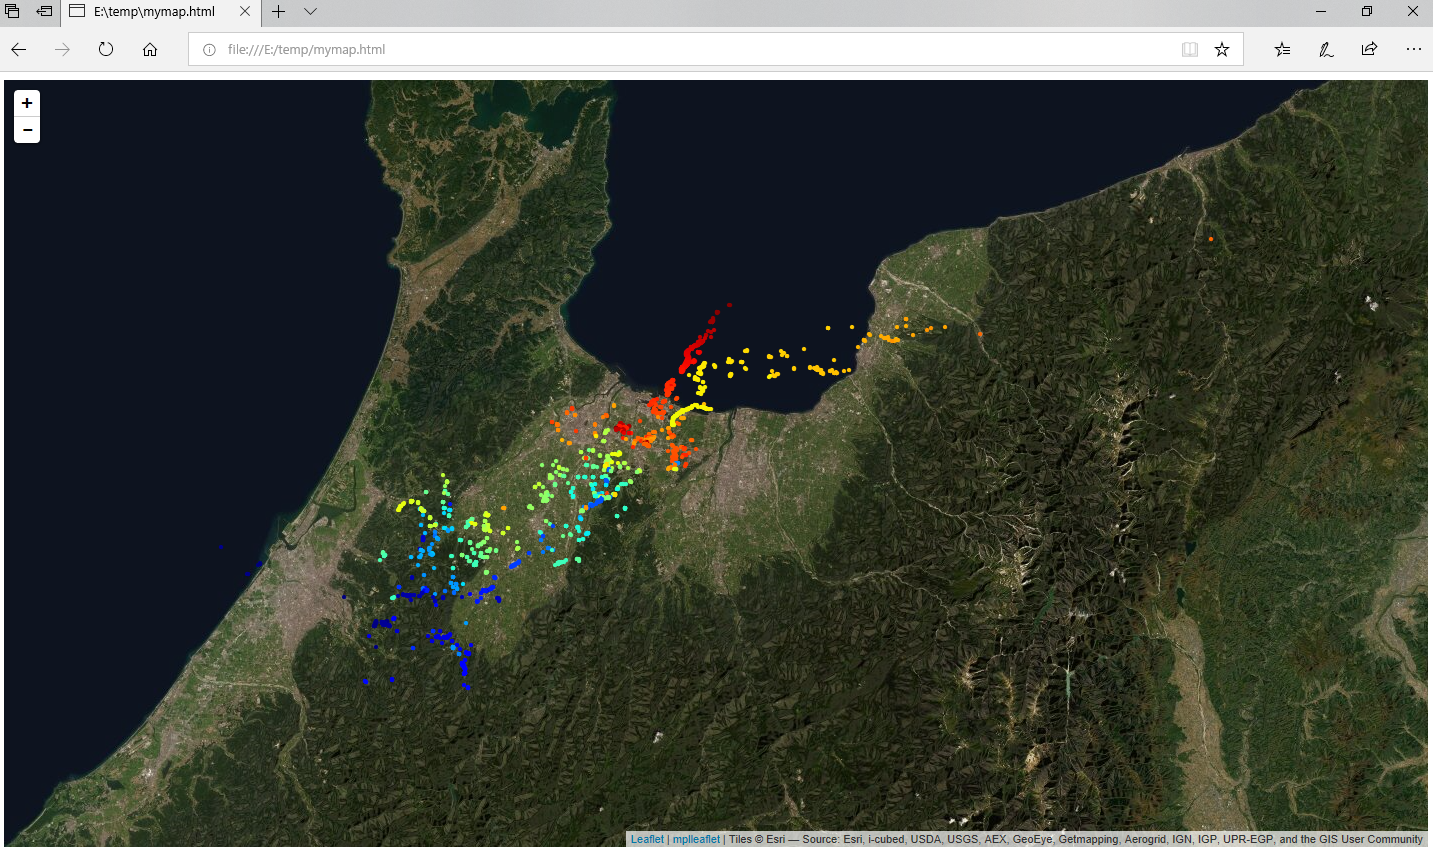
-
地形図
mplleaflet.show(path=strDir+mapName, tiles='esri_worldtopo')
mplleaflet.show(path=strDir+mapName, tiles='esri_worldtopo')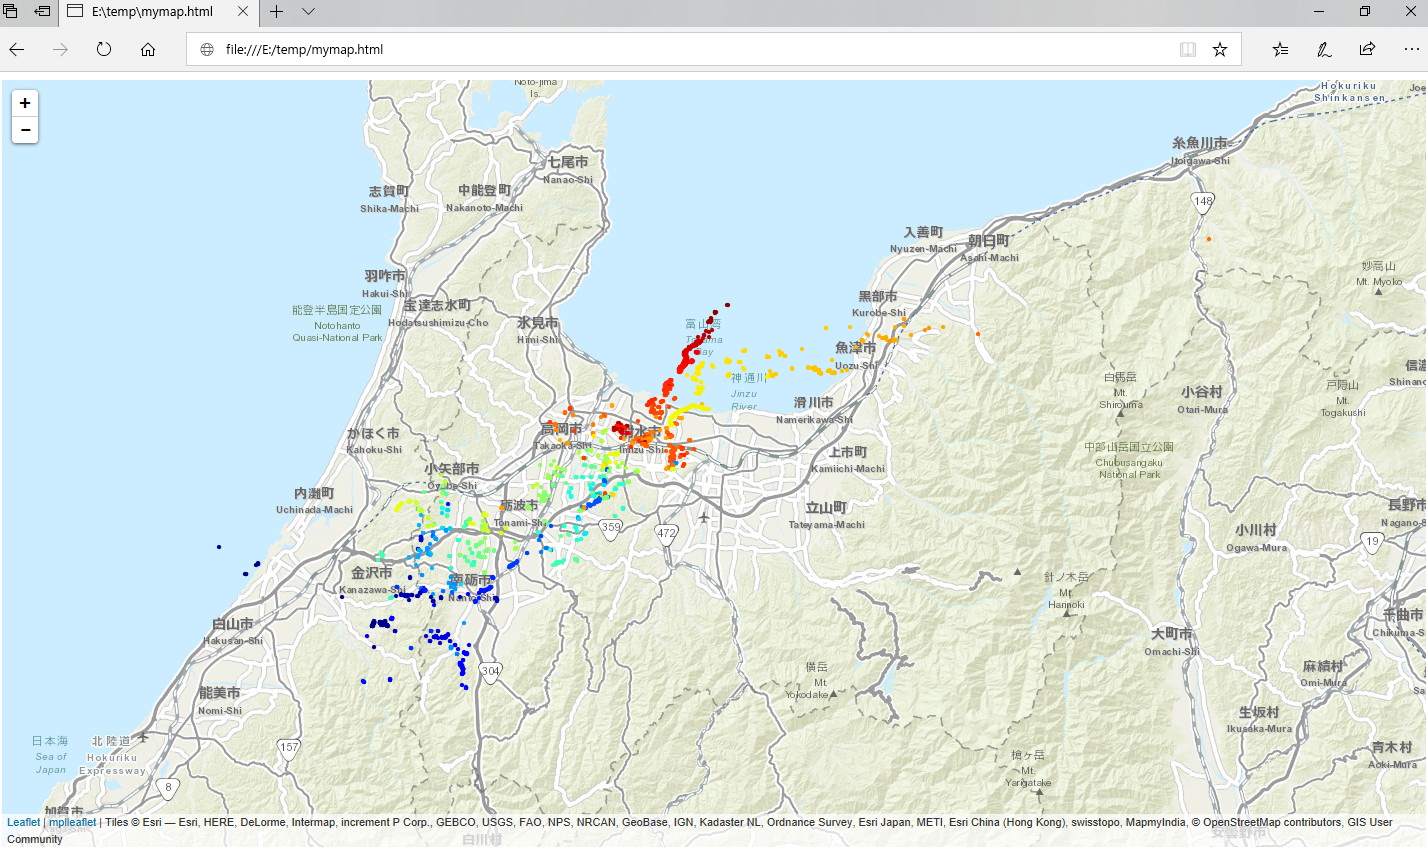
-
もう一種類の地形図
mplleaflet.show(path=strDir+mapName, tiles='esri_natgeo')
mplleaflet.show(path=strDir+mapName, tiles='esri_natgeo')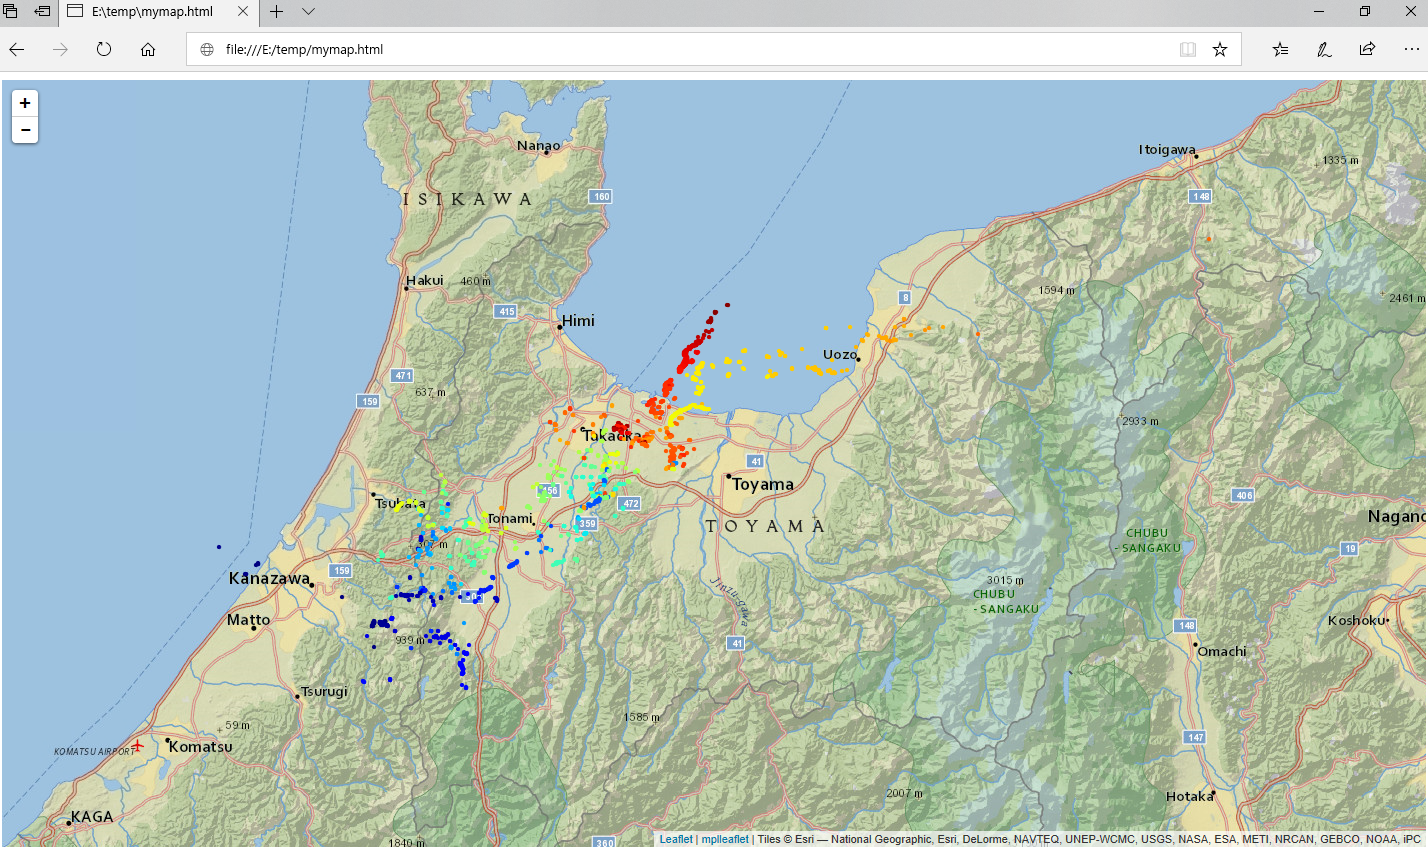
-
簡単な灰色地図(情報が少ないので、複雑なデータを表示するには最適かもしれない)
mplleaflet.show(path=strDir+mapName, tiles='cartodb_positron')
mplleaflet.show(path=strDir+mapName, tiles='cartodb_positron')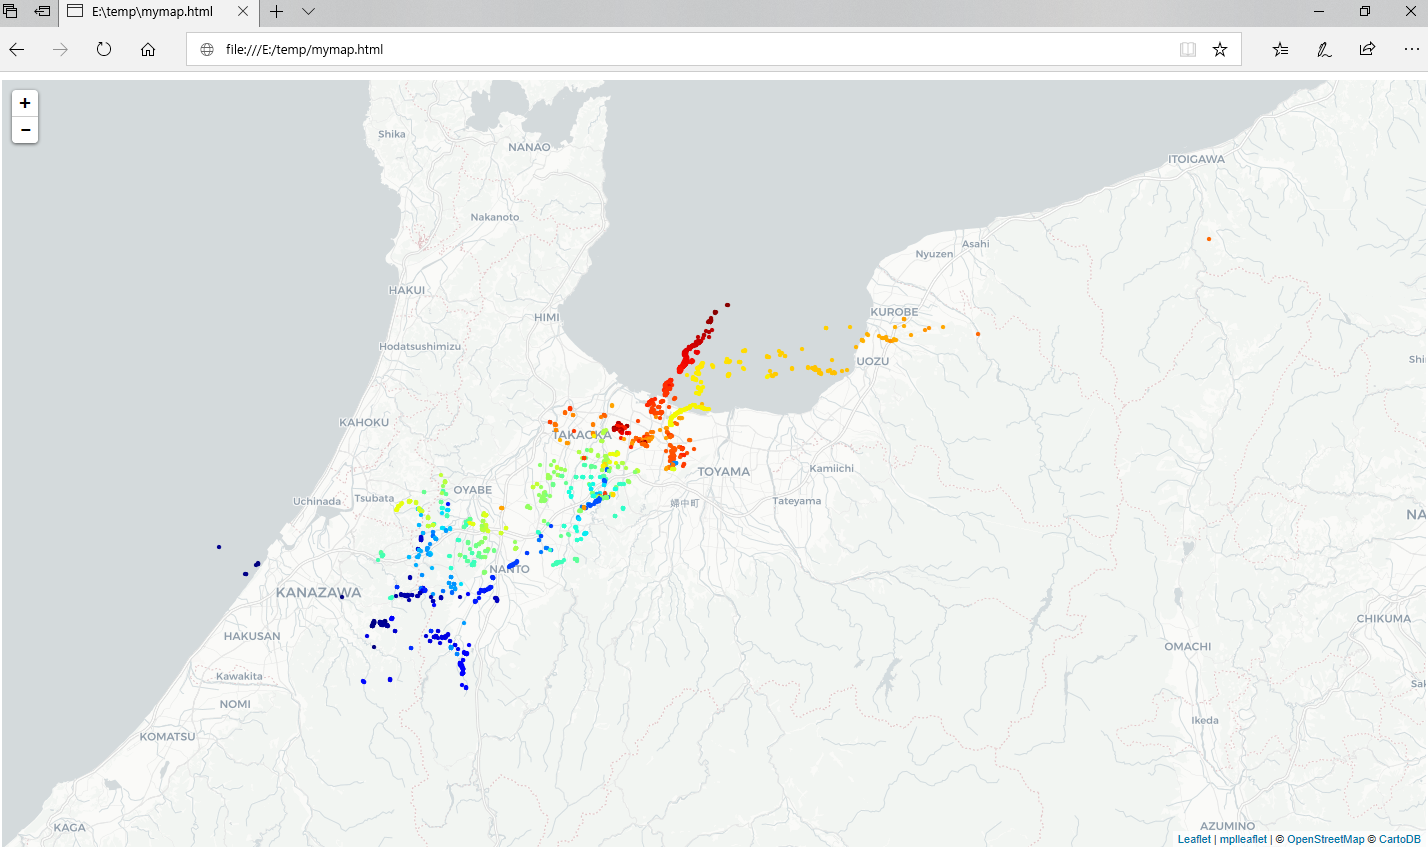
-
Stamen Watercolor
mplleaflet.show(path=strDir+mapName, tiles='stamen_wc')
mplleaflet.show(path=strDir+mapName, tiles='stamen_wc')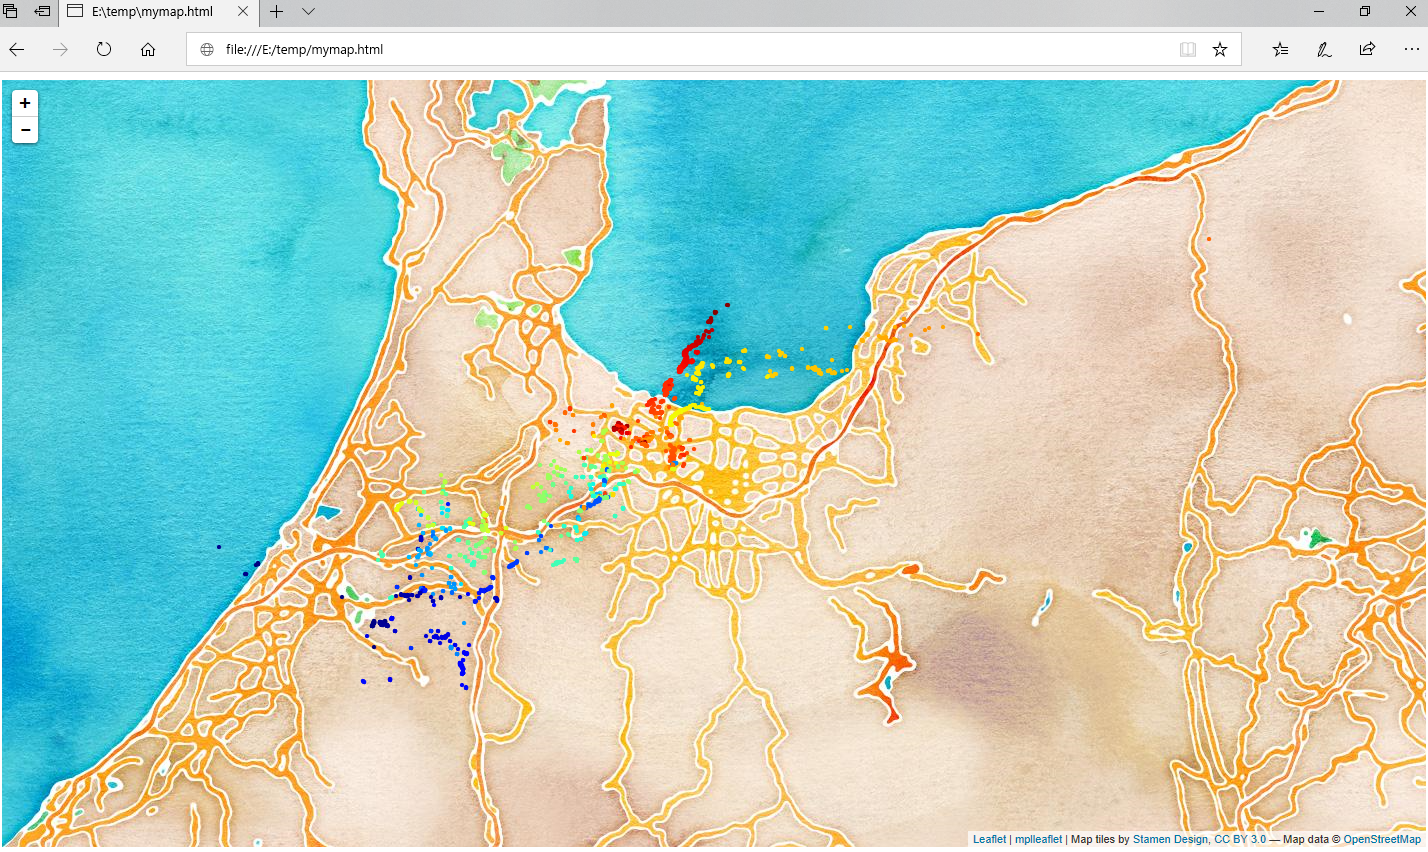
Back to Python関連資料